Be prepared for the unexpected

We’ve been training for years. Many of Åsnes Academy’s expert panel have worked with guiding, gone on relatively extreme trips and has spent most of their adult life training. Not only on training physically for long trips, but also mentally and practically on the fact that accidents can happen – and that you must then be ready to act. It is a good idea to bring an extra change of underwear, socks, hat and gloves/mittens. Plenty of food is important both to maintain pleasure and energy throughout the day, believe us. If you’ve been on a trip with “hangry” friends or children before, you know this. It’s all about being a little bit prepared. Preferably through planning before the trip and sensible packing of the bag. If you have also practiced first aid and are equipped to get in touch with the emergency services, you are at least somewhat prepared in the event of an accident.
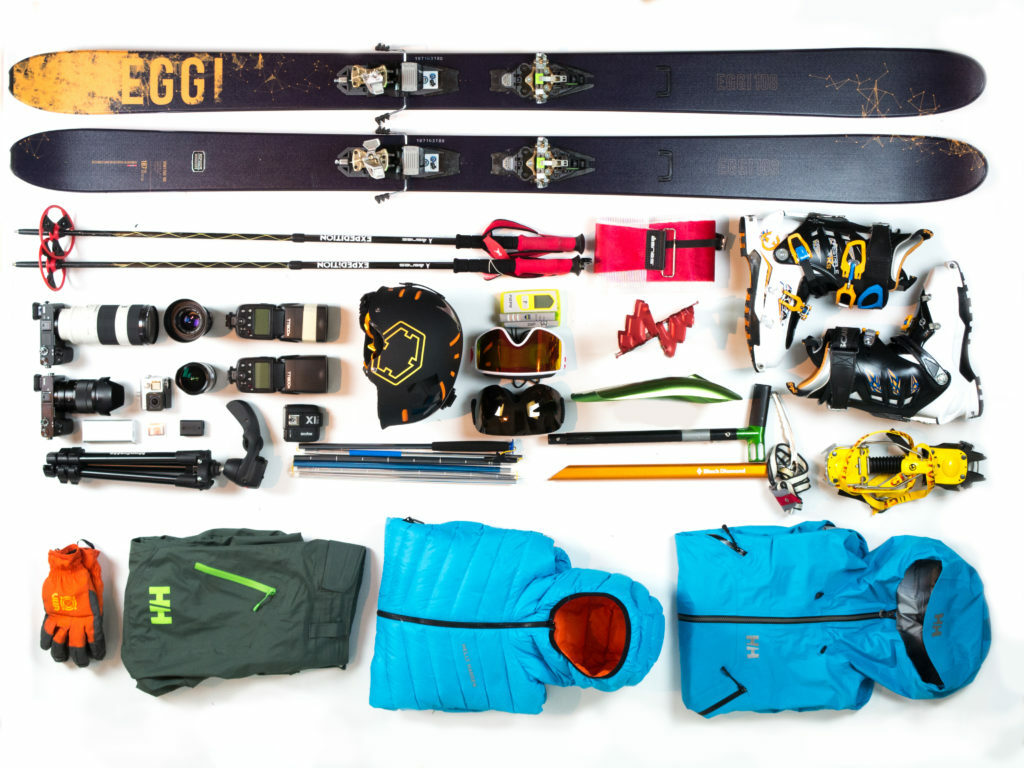
Avalanche rescue training is mandatory. Bivvy bag, some rope for repairs and converting skis into a toboggan, spare parts, a multi-tool, good first aid equipment, map, compass and mobile phone are essentials. In the mountains, help’s often far away, so you should be confident in the competence and equipment of your party. Experienced mountaineers, rescue teams and professional guides leave as little as possible to chance when packing their bags. Åsnes Academy Expert Panel

What should you pack for alpine touring?

Here’s in-depth article about what should be in the alpine touring backpack. There’s probably something in here for everyone who takes to the snow on skis. We have a few packing lists at the Åsnes Academy.

Here’s a list of what you should have as a minimum in your first aid kit (in a waterproof bag):

 
Painkillers
 
Headlight
 
Sterile compresses
 
Sports tape
 
Clingfilm
Compeed blister plasters
 
Matches
 
Latex gloves
 
A bread bag (fill with water, puncture, and use pressure to clean wounds)
 
Mobile telephone for contacting emergency servies

Consider taking also:

 
Sling or support bandages
 
Survival blanket (not necessary if you have clingfilm or a rubbish bag, but useful)
 
Wound wipes and/or og/eller disinfectant
 
Eye rinse
 
Safety pins
 
Scissors
 
Sterile gloves
 
Plasters
 
SAM-splints (splinting roll)
 

Accidents in the outdoors – what do you do?

First aid and mental preparedness

We check the weather forecast, discuss route and make plans as a matter of routine. This is essential for limiting risk. But moving through nature, you’re never completely safe. So what do we do when the avalanche breaks loose, a friend falls, or a skier takes a serious tumble? Are we sufficiently prepared?
“How long does it take for the ambulance to arrive where you live? If the answer is eight minutes, as it is in ideal conditions in Oslo, I used to say “ry to hold your breath for eight minutes”. Then everyone realises that if you do that, you’re dead. That means you and I have to take the initiative”.  Former President of the Norwegian Red Cross, Sven Mollekleiv

Get your knowledge down

If you’re going to take to the winter mountains, you should be secure in your basic knowledge of first aid. Finding the motivation to save the lives of those you’re skiing with, family and friends, shouldn’t be difficult to find. Everyone has a duty to help others in need. Do learn the basics! First aids something everyone, generally, should have a handle on. On a basic course, you’ll learn what to do in critical situations and treat injuries such as fractures, cuts, the consequences of a fall, crushing, and so on. People injure themselves every day. More than 2,500 suffer acute and unexpected cardiac arrest every year outside hospital. Only 1-2% survive. Here are a few tips covering some important areas you should focus on when it comes to life-saving first aid.

Be ready to act! It helps!

The smallest help is better than nothing.

Self-confidence and initiative

For first aid, the most important thing is action. The more you know, the better, certainly – but the most important thing is that you actually do something. Be ready to: act get assistance provide useful assistance stabilise the situation If you call 113 (the emergency number in Norway) you’ll find very competent people on the phone. They’ll guide you if you’re unsure of what to do. And of course you can call for help. In many situations, where help is urgently needed, any help is useful. But these can be unsettling situations; you may feel adrenaline, stress and uncertainty. So the first thing to do is to ensure your own safety. It’s not going to serve anyone if you initiate quick first only to immediately expose yourself to an accident shortly afterwards. Survey the situation before entering it. If necessary, move the injured person to a safer place.

Get an overview

In a stressful situation, it’s easy to be overwhelmed when adrenaline and stress kick in. Perhaps even more so if a dear friend or a family member is in distress. So it can extremely useful to take a moment to stop, to consider the situation and get an overview before jumping right in. Examining injured and/or unconscious people The first few minutes are decisive for deciding the outcome. So it’s crucial to examine the patient systematically, to call for help, and to take any necessary life-saving measures. Is avalanche rescue required? Are there more injured? Who do you treat first? The fact that someone is lying screaming is, in many ways, a good sign. Those who lie completely still may require more urgent assitance. Get a quick overview of the following:
 
What happened?
 
Is the patient conscious? Responsive?
 
Is the patient breathing normally?
 
How is the patient’s skin? Damp? White? Wet? Etc.

C A B

​​​​​​​​​​​​​​It’s important to take life-saving measures as quickly as possible. In many cases, you’re taking measures to buy time. The ABCD of first-aid is a useful mnemonic to quickly appraise the situation. It it stands for:
  • Airways – does the person have obstructed airways?
  • Breathing – is the person breathing normally?
  • Circulation – does the person have pulse?
  • Disability – does the person have other obvious injuries? Are they responsive?

If any of these give cause for concern, ring 113 at once (in Norway).

Do this by calling 113 in the normal way or by using the Hjelp 113- app (Norwegian air ambulance) which will give the emergency operator your precise location.

ABCD

A – airways

B – breathing

C – circulation

D – disability

Notifying 113

In Norway, we have three emergency centres: 1-1-0 for Fire, 1-1-2 for the Police and 1-1-3 for Medical Emergency (ambulance). When you come across a first aid situation, or in situations where you’re unsure of what to do, 1-1-3. No matter which of these you call, you’ll be put through to the right agency!

Put the phone on speaker and follow these principles:

 
Keep calm (breathe; think; speak)
 
Explain who you are
 
Say where you are (the address, GPS coordinates, location).
 
Say who is injured
 
Give an accurate description of the situation; say how many people are involved.
 
Ask them to confirm the information you provide

The ABCDE drill

“From head to to – treat as you go!”

This is a drill many people with a background in military service or a connection to rescue services will know. It’s the most common and widespread framework for systematically treating patients. If you learn it, you’re well equipped in most first aid situations.

A

Airways

Secure unobstructed airways in neutral position (head and neck in line). Look for foreign objects in the mouth and throat. Remove them if possible. If an epileptic seizure is suspected, use something other than your fingers so you don’t get bitten.

Airways and breathing

The airways must be open for air to reach the lungs. You ensure free airways with a few simple steps:
  • Carefully turn the injured person onto their back.
  • Gently tilt the head back.
  • Lift the chin forward using a couple of fingers under the tip of the chin.
  • Look into the mouth; remove any blockages.
You can feel, listen and look for natural breathing while you do this. Put your ear to the injured person’s mouth; listen and feel for breathing. Check whether the injured person’s chest is moving. If you don’t see a breath in ten seconds, start CPR. If the person is breathing, continue other treatment. If the person is not breathing and is unconscious – start CPR!

B

Breathing

How is the patient breathing? (Fast, slow, deep, shallow breathing?) Are there any visible injuries or marks on the chest or back that could affect respiration? Check the throat and each side of chest to see if they’re moving equally.

Circulation

If the injured person’s breathing, look for other injuries. If blood pressure drops below a certain threshold, blood will not circulate around the body to provide the brain with oxygen. If you bleed a lot, externally or internally, circulation will eventually be reduced so much that you lose consciousness and die. Remember that Gore-Tex and technical outerwear are often waterproof and that large amounts of bleeding can occur before it shows. External bleeding is best stopped by applying pressure to the wound and by raising the injury above the heart.

Use bandages; improvise with what you have – clothes and sports tape, for example. Internal bleeding can be difficult to diagnose. Symptoms can include abdominal pain, swelling and bloody discharge. The blood’s ability to clot is drastically reduced by cooling, making it more difficult to stop bleeding. The most important measure against internal bleeding is therefore to keep the patient warm.

D

Disability

Is the patient conscious? Responsive? Are head injuries suspected? How large are the pupils? Are they the same size and do they react to light?

E

Expose/Exam/Environmental control

Once you’ve inspected the patient from head to toe to find injury, cover them o preserve body temperature. Place them on their side, in the recovery position, and monitor them until help or evacuation can be carried out.

Keep the patient warm

Usually, we can stay warm by keeping ourselves moving. But this difficult with a broken ankle, and impossible if you’re unconscious. Getting cold when you’re injured can be dangerous – the body works in high gear to keep warm, and if it experiences the shock of damage on top, the body can be overwhelmed. Hypothermia commonly follows accidents where the body is exposed to the cold. The core temperature can drop quickly following an accident causing unconsciousness outdoors. While hypothermia also occurs among avalanche victims, suffocation and trauma are greater threats. Travelling in the mountains with inadequate clothing and planning can have serious consequences. Many have to be rescued every year by volunteers and rescue teams. Hypothermia largely affects people without adequate protection from the environment.

Treating hypothermia

It’s important to have basic  knowledge of the most important principles of treating people suffering from exposure to the cold. This is just as relevant for us privately, when we move through the mountains in winter, as it is for professional rescue services and guides.

Rescue

Should you need a helicopter or an alpine rescue team, report your situation. Being rescued from the mountain can take some time. It’s crucial to communicate your position as precisely as you can, so that time isn’t wasted on misunderstandings! If you’re in doubt about what to do, explain the situation and let the emergency operator make the decisions for you. If a helicopter is to come, it’s essential that you describe the weather and visibility. As you can’t be sure that a helicopter can fly or land, you must be prepared to wait for a long time. So make sure you’ve packed the minimum essentials for winter trips, even if it’s “only” a day trip. Remember also to take into account the evacuation itself. You may have to move so that a helicopter can land. For rescuers in the Red Cross and alpine rescue teams, it’s essential that they receive the most precise information about your position as possible. Looking for people who are moving, or whose whereabouts are unknown, can be very difficult.

Illustrations and resources

Below are some useful illustrations and resources for first aider

Recovery position

Illustration from Norsk Helseinformatikk (Pasienthåndboka)

Place the patient on their back Nearest arm 90° at the elbow joint Opposite arm is placed over the chest Monitor the patient’s reactionr

Take and lift the shoulder farthest from you (blue arrow) while lifting the knee farthest from you (red arrow) Monitor the patient’s reaction

Grasp and lift the shoulder farthest from you (blue arrow) and at the same time lift the knee farthest from you (red arrow) Monitor the patient’s reactions

Place the upper arm under the head and stretch the neck/bend the head slightly backwards Make sure the patient is breathing and has a clear airway before calling for help

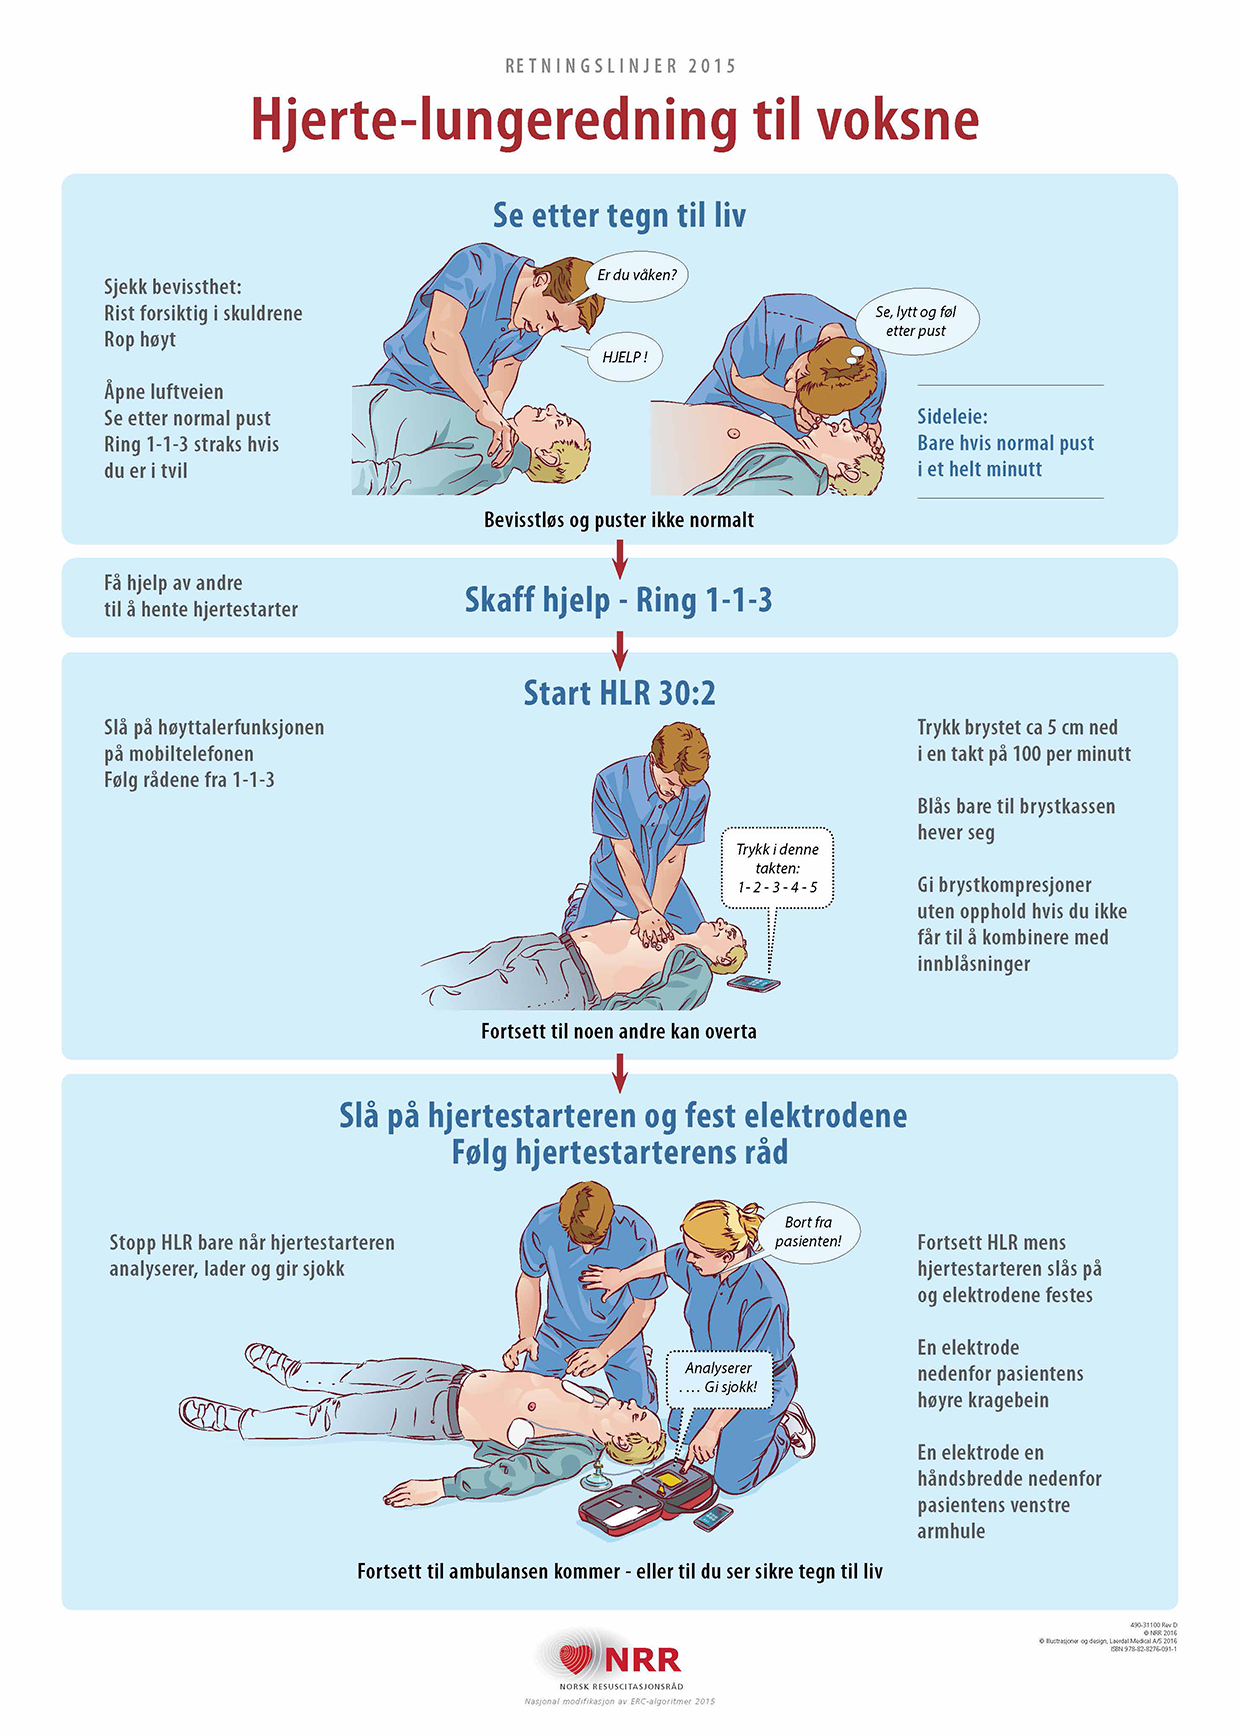
Cardiopulmonary resuscitation (CPR) Illustration from Helse Norge

Treatment injuries of different kinds

Below are links and guides on treating injuries. The injuries we’ve included here are injuries typically encountered on winter tours.


Eight reasons to take a course in avalanche rescue

Avalanche rescue is an essential skill, required by all of us who visit avalanche terrain. No one wants to have to use these skills – but if you ever need them, you need to have them down. True, the most important thing is to avoid being in an avalanche in the first place. But if something were to happen, every second counts. And this means training.

Read More »

Seven tips to find a safe route up the mountain

Here are some simple, concrete, tips on how to find the safest route up a mountain on skis. Some things in life are necessary. Some things aren’t necessarily easy. But, as every skier knows, the only thing that really matters is skiing as much as humanly possible – so getting these down is a question of making life worth living.

Read More »

Handling hypothermia

Do you know what to do when you’re faced with someone dangerously cold? Command of the basic facts can be lifesaving – and this is just as relevant for us those of us who hit the mountains for the joy of it as it is for guide and members of the rescue services.

Read More »

Firing up the stove in winter

Nothing whets the appetite more than a long day skiing in the winter mountains. Fire up the burner, boil some water for some tea and reach for the packet of dehydrated chilli: paradise found. But doing this in the winter you need to bear a couple of things in mind. So here are some wily strategies to make things easy and safe.

Read More »

Digital tools for the ski tour

Don’t give up if your go-to spots are snowless or unskiable wastes. There could well be untouched, soft powder in them there hills! Read on to find digital tools for finding the white stuff when all hope is lost…

Read More »

13 tips for better orienteering.

Few of us set out into the winter mountains when the weather’s bad and visibility’s poor. And we’re careful for good reason. It’s risky. When nature shows its muscles, it forces us to reflect. Even so, Norway’s a country with plenty of mountains and even more weather. If we only headed out when the sun was shining, the season would be very short. We head out when the weather’s less than perfect – which means we need to be able to find our way with a map and compass. Here are 13 tips for using a map and compass, then, for those of us hitting the mountains in winter.

Read More »