Tuning. Bevelling. Sharpening. What’s it all for?
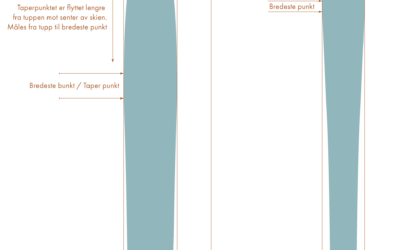
Skis, especially alpine skis, come from the factory with their metal edges bevelled according to the designers’ specific intentions. But after this, they’re ours to carve, care for, and tune the way we want according to the way we ski. This bevelling is defined by two numbers. The first number, for the base edge, tells us the angle the metal edge is cut where it meets the base of your skis. This affects the point at which the side edge bites the snow when it’s time to carve. The second number tells us how sharp that side edge actually is. To put it another way, if your base edge is bevelled to 1°, that means the edge is angled away from the snow at the base by a degree. Your edges won’t bite until you begin to edge your skis. A side edge bevelled to 1° means that this edge is angled a degree inwards, towards the centre of the ski (the diagram might be helpful here). This affects the amount the edge can penetrate the snow once it engages. In scientific terms, this affects the carviness of your carving.
General recommendations
Recreational skiers, beginners and intermediate skiers
| Average skier | Hard snow | Soft snow |
| Base edge | 1° | 1° |
| Side edge | 1° – 3° | 1° |
| Asvances skiers | ||
| Base edge | .5° – 1° | 1° |
| Side edge | 2° – 3° | 1° – 2° |
| Junior | Slalom | GS | SG & DH |
| Base edge | .5° – 1° | 1° | 1° |
| Side edge | 3° | 3° | 3° |
| WC/Elite | |||
| Base edge | 0° – .5° | 0° – .5° | .5° – 1° |
| Side edge | 3° – 4° | 3° – 4° | 3° |
Sharpening skis
Tuning steel edges – general rules
Bevelling the base edge – the steel edge extending from the base – means lifting it slightly from the snow a degree or so, so that it will not bite until the ski is tilted slightly. Too little angle on the base edge and the edge might not bite when you want it to; too much angle, and you might experience a little instability: you’ll really have to edge the ski to force a bite. The side edge is usually sharpened between 1° and 3°. The higher the angle, the sharper the edge; the sharper the edge, the deeper into the snow it’ll cut. Too little angle on the side edge leads to a toothless skidding ski; too sharp leads to a ski with too much slicing-power (over-aggressive “railing” isn’t intrinsically pleasurable for all). Edges must be sharp from contact point to contact point for carving. Without the bite, they’ll just skid when you initiate a turn. If your skis cut too early or too much, you can raise the angle of the base edge at the tips and tails, leaving the middle section (see below). You can also adjust the canting on your ski boots.Tuning the base edge
Always start with a ski with a completely flat sole. Get a base grind if it isn’t completely level. Clamp the ski in a vice, base upwards. Using an adjustable file guide to set the angle you want, pull a course file towards you using long strokes. It’s not necessary to press over-firmly; you should be able to see from the shavings and the shininess of the edge and that you’re removing material. That’s all the pressure you need.
HOT TIP
To see where you’re removing edge material, mark the entire edge with a black marker before you start filing. This way it’s easier to get a good image of where you’re removing material with every stroke – and where you’re leaving it..Planing the sidewall
Most skis are designed with plastic or aluminium sidewall reinforcement just above the edge. This can get scraped off by your file as you try to reach to reach the metal, clogging the tool, or can prevent you from reaching the metal edge altogether. The solution is to remove some of the sidewall material with a sidewall planer before you start working on the side.Working the side edge
Side edges need daily maintenance if your skis are to perform to their best. Hold the ski side edge upwards in a vice, base facing away from you. Like this, you can tool the edge with more control. With a medium-course file, file with firm-enough overlapping strokes in a single direction until your edge is sharp. Follow up with a medium diamond file to polish the edge. You can use a progression of finer files for a racing finish.Should skis be de-tuned at the tips and tails?
Older downhill-oriented skis tended to be longer and shaped with less sidecut. Turns were initiated with more of a rotary “steering” force, which meant that the edges at the front and back could be prone to hooking in the snow. The solution was to dull (“detune”) them at the tip and tail. Modern skis, on the other hand, with their shorter lengths and more pronounced sidecut, are designed to turn more on their edges, carving the snow throughout your graceful arc. According to the current orthodoxy, it isn’t necessary to detune the new generation of skis but to keep them sharp, end to end. There are exceptions of course! Many of us detune our tapered fjellski (cross-country skis built for breaking trail) at the front and back for easier turns. And if you prefer a ski that turns a little more easily, you can detune the edges of your Alpine touring/freeride skis a little at their widest in the front third (and maybe at the end of the tail). This is literally the work of minutes with a file or fine-grit sandpaper. For skis with rocker and taper you can detune the edges in the section between the widest point of the taper and the point where the sidecut ends (that is, the point where the skis begins to widen, fore and aft). You might want to begin by only partially detuning this area before trying it out.Machine grinding
If your sole isn’t flat, or it’s too gouged for its own good, take it to a workshop. Stone grinding and machine tuning can work wonders on base and edges, even if you probably won’t get angles precise enough for racing (fortunately, most of us won’t be racing, of course). If you have the tools, setting or maintaining angles yourself when you get your skis back from the workshop after a stone grinding and having the edges done isn’t so complicated.Tuning. Bevelling. Sharpening. What’s it all for?
Skis, especially alpine skis, come from the factory with their metal edges bevelled according to the designers’ specific intentions. But after this, they’re ours to carve, care for, and tune the way we want according to the way we ski. This bevelling is defined by two numbers. The first number, for the base edge, tells us the angle the metal edge is cut where it meets the base of your skis. This affects the point at which the side edge bites the snow when it’s time to carve. The second number tells us how sharp that side edge actually is. To put it another way, if your base edge is bevelled to 1°, that means the edge is angled away from the snow at the base by a degree. Your edges won’t bite until you begin to edge your skis. A side edge bevelled to 1° means that this edge is angled a degree inwards, towards the centre of the ski (the diagram might be helpful here). This affects the amount the edge can penetrate the snow once it engages. In scientific terms, this affects the carviness of your carving.General recommendations
Recreational skiers, beginners and intermediate skiers
| Average skier | Hard snow | Soft snow |
| Base edge | 1° | 1° |
| Side edge | 1° – 3° | 1° |
| Asvances skiers | ||
| Base edge | .5° – 1° | 1° |
| Side edge | 2° – 3° | 1° – 2° |
| Junior | Slalom | GS | SG & DH |
| Base edge | .5° – 1° | 1° | 1° |
| Side edge | 3° | 3° | 3° |
| WC/Elite | |||
| Base edge | 0° – .5° | 0° – .5° | .5° – 1° |
| Side edge | 3° – 4° | 3° – 4° | 3° |
Sharpening skis
Tuning steel edges – general rules
Bevelling the base edge – the steel edge extending from the base – means lifting it slightly from the snow a degree or so, so that it will not bite until the ski is tilted slightly. Too little angle on the base edge and the edge might not bite when you want it to; too much angle, and you might experience a little instability: you’ll really have to edge the ski to force a bite. The side edge is usually sharpened between 1° and 3°. The higher the angle, the sharper the edge; the sharper the edge, the deeper into the snow it’ll cut. Too little angle on the side edge leads to a toothless skidding ski; too sharp leads to a ski with too much slicing-power (over-aggressive “railing” isn’t intrinsically pleasurable for all). Edges must be sharp from contact point to contact point for carving. Without the bite, they’ll just skid when you initiate a turn. If your skis cut too early or too much, you can raise the angle of the base edge at the tips and tails, leaving the middle section (see below). You can also adjust the canting on your ski boots.Tuning the base edge
Always start with a ski with a completely flat sole. Get a base grind if it isn’t completely level. Clamp the ski in a vice, base upwards. Using an adjustable file guide to set the angle you want, pull a course file towards you using long strokes. It’s not necessary to press over-firmly; you should be able to see from the shavings and the shininess of the edge and that you’re removing material. That’s all the pressure you need.HOT TIP
To see where you’re removing edge material, mark the entire edge with a black marker before you start filing. This way it’s easier to get a good image of where you’re removing material with every stroke – and where you’re leaving it..Planing the sidewall
Most skis are designed with plastic or aluminium sidewall reinforcement just above the edge. This can get scraped off by your file as you try to reach to reach the metal, clogging the tool, or can prevent you from reaching the metal edge altogether. The solution is to remove some of the sidewall material with a sidewall planer before you start working on the side.Working the side edge
Side edges need daily maintenance if your skis are to perform to their best. Hold the ski side edge upwards in a vice, base facing away from you. Like this, you can tool the edge with more control. With a medium-course file, file with firm-enough overlapping strokes in a single direction until your edge is sharp. Follow up with a medium diamond file to polish the edge. You can use a progression of finer files for a racing finish.Should skis be de-tuned at the tips and tails?
Older downhill-oriented skis tended to be longer and shaped with less sidecut. Turns were initiated with more of a rotary “steering” force, which meant that the edges at the front and back could be prone to hooking in the snow. The solution was to dull (“detune”) them at the tip and tail. Modern skis, on the other hand, with their shorter lengths and more pronounced sidecut, are designed to turn more on their edges, carving the snow throughout your graceful arc. According to the current orthodoxy, it isn’t necessary to detune the new generation of skis but to keep them sharp, end to end. There are exceptions of course! Many of us detune our tapered fjellski (cross-country skis built for breaking trail) at the front and back for easier turns. And if you prefer a ski that turns a little more easily, you can detune the edges of your Alpine touring/freeride skis a little at their widest in the front third (and maybe at the end of the tail). This is literally the work of minutes with a file or fine-grit sandpaper. For skis with rocker and taper you can detune the edges in the section between the widest point of the taper and the point where the sidecut ends (that is, the point where the skis begins to widen, fore and aft). You might want to begin by only partially detuning this area before trying it out.Machine grinding
If your sole isn’t flat, or it’s too gouged for its own good, take it to a workshop. Stone grinding and machine tuning can work wonders on base and edges, even if you probably won’t get angles precise enough for racing (fortunately, most of us won’t be racing, of course). If you have the tools, setting or maintaining angles yourself when you get your skis back from the workshop after a stone grinding and having the edges done isn’t so complicated.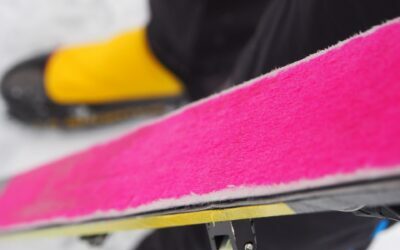
Choosing the right skin
Short skins have revolutionised trips to the backcountry on nordic skis. Long skins get you to the top. You can nail gliding, climbing, pulling, gripping, poor conditions, good conditions, days when you’re feeling too lazy to wax. We break down material, length, width, care, and everything else you’ll want to know.

Myths about skins – busted
Not everything you hear about skins is right. We’re here to dish the skinny on skins, busting some misconceptions about your skins, complete with counter-evidence and tips garnered through trial and error in real snow, by real skiers, in actual Norway.
Rocker, nordic rocker, taper and sidecut
Reading the specs, we read about rocker, nordic rocker, taper, and sidecut. If you don’t know what these things are, or what effect they have on the properties of your skis, read on as we break it down…

Understanding sidewalls
Sidewalls. All skis have them. Few of us know what they actually do. Join us as we explain how they affect the strength and properties of your skis.
What’s inside your skis?
What are the skis made of? How are they made? What sets Åsnes apart? Here’s that guide to the inside of our skis you were looking for!
Waxless or waxable skis?
Buying new skis and not sure whether to choose waxable or waxless bases? Maybe you think grip wax is tricky. Maybe you find the convenience of waxless is enticing. Here’s your path through the pros and cons (and the science!) of both…