Planning’s half the tour!
Planning makes a trip safer. Which is to say more enjoyable. But it’s also a source of inspiration. Clarifying expectations is also an important part of tour-planning. If everyone’s on the same wavelength there are a host of things that go better.General advice:
Follow the applicable rules for driving where you’re going, for hunting, and for other leisure activities. Follow the Mountain Code. Follow the laws of the right to roam. We recommend choosing tours suitable to the skills and knowledge of everyone in your party. Keep your knowledge about avalanches, first aid, survival and orienteering current. The tips below are just tips, and tips never supersede experience and training – but they’re definitely useful!Before you set out
Let everyone know where you’re going. It’s an excellent idea to make a plan A, B and C: it’s good to have options if something changes. Adapt the tour according to ability and conditions if new information comes to light. If you’re going on a long tour abroad, get on with visa applications and logistical challenges as early as possible!THE JOY OF PLANNING.
Yes, planning makes a skiing mission safer and more enjoyable. Ourselves, we find planning long tours, expeditions and complicated projects inherently pleasurable. There’s a lot of joy in looking at maps, thinking through logistics, food, fuel consumption and things like this. With a little practice, you become pretty good at doing this quickly and efficiently. We can spend hours dreaming up endless itineraries. Because – why not.ADAPT THE TOUR FOR EXPERIENCE AND CONDITIONS.
Choosing a tour according to ability and conditions is at the heart of Norwegian safety culture. It’s been the basic, principal, rule for the Norwegian friluftsliv – the culture of outdoor life – forever. In line with Nils Faarlund, the philosopher of friluftsliv, it’s simply defined as “attentive travel in free nature at your own risk”. What counts is the sum total of knowledge and motivation in the party you set out with. Do I – whether I’m going on a trip alone, or in a group, have what’s required to handle any situation that might arise? How are the snow and weather conditions? Are we going into avalanche terrain? Does everyone in the group share the same motivation and goals for the trip we’re about to undertake? Do I, and the rest of the group, have the physical capacity, skill and the correct equipment for the ambitious trip we have planned? If everyone answers positively, a number of opportunities in nature are open to you. Almost everything’s feasible as long as you give it some thought.
Good tour-planning – the recipe
Begin by deciding on the kind of trip you want:
Set the framework for the trip:
1. Plan according to ability
Have a realistic relationship with your own abilities to handle different trips and situations. Everyone says it, and it sounds really boring, but it might be the most important piece of advice you can take to heart. Start carefully, preferably with trips that have a low threshold and gain experience that you can build on. This provides security, empowerment and knowledge over time. If you feel there is something you cannot master, seek out someone who can teach you, go with a friend on a trip or sign up for a course.2. Go on short “test drives” for the equipment and yourself
A fun, easy, form of training. Test things you haven’t tested in an environment as safe as possible. The idea is, simply, to try out new things in safe and familiar surroundings and situations. A tent excursion to your back garden; a day-tour from a cabin, for example. Test different equipment; see how it all works. Gradually increase the complexity of the trip.3. Map and compass – get them down!
Buy a folding map covering an area you walk a lot or somewhere you’d like to visit. In most cases, the map’s simply the most important tool you can take with you. Don’t rely solely on your phone and your GPS. These can get drowned, broken, lost, or die in the cold where a map endures. Analogue tools like maps and the compass are just as accurate with a little practice. Navigating with a map, looking at topography, reading contour lines and getting to know the terrain has a real joy of its own. Maps also provide an excellent overview. Practice navigation, orientation and finding things. Learn to orient the map; find out where you are and where you’re going. Take a compass course. Not labour the point or anything, but this can be the difference between life and death.4. Follow the weather
Keep an eye on the weather forecast for the place, or the area, you’re going to. Check the long-term forecast and take precautions. But never blindly trust the weather forecast. Use it as an indication of what to expect. Check several different sources; write it down before you leave. In Norway, you must be prepared for the fact that the weather can change relatively quickly if you’re going on longer trips.5. Know when it gets dark
It’s more than handy to know when it gets dark. Not just when you can expect a nice sunset but when it gets really dark and you need light. It’s easier to navigate, to pitch a tent, to cook when there’s light. Plan. It’s also a good indicator of when there’s good fishing or good hunting.6. Familiarise yourself with the equipment well in advance of going on a long trip
Obvious one – but you need to be familiar with your new equipment. Learn how to get your tent up. Break in your new boots. Know how to light the burner. It’s also a good idea to incorporate some fixed routines. You need to make sure your equipment’s functioningm that you understand what’s what, when you find yourself in the middle of the high plateau alone. It’s deeply problematic to get massive blisters and a bad back in the middle of the wilderness because your pack and shoes don’t fit properly..7. Making a packing list
Trip-planning is catnip for those with OCD, list-mania and a huge need for control. Get listing. Knock yourself out! For us, it’s just as necessary for a visit to the supermarket before you head off to the cabin as they are for an expedition. It can be difficult knowing where to get started. But since we’re so kind, we’ve collected a bunch of packing lists for you.Pakkelister
8. Food and drink
FOOD = HYGGE. Hygge = a feeling that all is well with the world. Food’s worth thinking about. Being hungry and unhappy is completely unnecessary. Strictly speaking, it’s pretty stupid. There’s also no point in sitting outside and eating in a storm if you can pitch your tent, find some shelter, or wrap yourself in a bivvy bag. If you’re in such a hurry that this isn’t possible then something’s gone wrong somewhere. It’s a planning failure. Choose food that makes sense for the tour you’re taking. Steer clear of tinned stew. It’s heavy and it’s not 1862. Oatmeal takes up little space and weighs less; bread’s light but takes up a lot of room. How far are you going? How much are you prepared to carry there? And check your fuel if you’re cooking hot food.9. Make a risk analysis, discuss risk acceptance in the group and clarify expectations
It’s true that you can break your ankle on flat ground. There’s a degree of risk involved, even on short trips. Not to overstate the the danger, but we’ve seen people evacuated by helicopter twenty minutes from the back door because they were careless. It’s worth reflecting on what can happen and how to deal with it. Weighing up risk is a preventative measure. On longer, steeper, and more demanding trips, there are always several factors to take into account. Announce where you’re going, make sure everyone in the party knows the route, and take some simple precautions. Know who to call if something happens to you or to someone in your party. Remember that out in the wilds you can’t take mobile coverage for granted, and there are places where a rescue helicopter can’t land. You could potentially be stuck for a few days. If you’re going on a climbing trip, an expedition or skinning up to the peak of a mountain, it’s also a good idea to clarify expectations and to know a little about the tour party. There are times when you have to stand your ground to reject others’ idea of acceptable risk. Make sure your regular tour companions share your idea of what constitutes acceptable and unacceptable risk. And never take unnecessary riskå.DRAW UP A LIST WITH FOUR COLUMNS:
1. What can go wrong? 2. What’s the probability of this occurring? 3. What are the consequences of that happening? 4. Measures to reduce/eliminate the risk.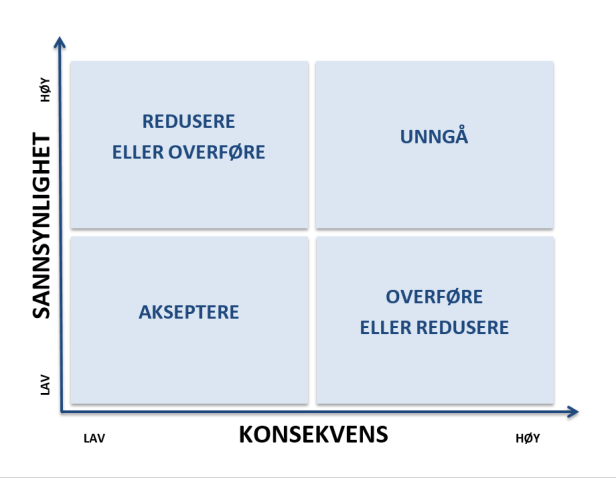
AVOID RISK
This is the conservative approach. Not always right for everyone, but easiest and most effective. If we avoid risk, we remove the problem. Everything’s fine. Your threshold for what constitutes “unacceptable” must be low and your willingness to add miles to the route must be high if you must absolutely always avoid every risks, but at least you’re safe. The choice to avoid risk might perhaps be taken when you’re well into the tour. It can be difficult to adopt a new plan or change the goal and purpose of the trip while you’re well on your way. But avoiding risk doesn’t necessarily mean hiding under the covers at home; it can be achieved by changing the plan, changing the time, taking a new route or turning around in time. You can at least minimize the risk considerably, for example, if you postpone a summit tour for a few days when there’s a high risk of avalanche reported.TRANSFER THE RISK
This is largely about transferring the risk to a guide, or possibly sharing it with others in your party. Find someone better than you and learn from them. Hire an experienced mountain guide or join DNT. In this way, you avoid getting in over your head – your “transfer” some of the risk assessment to someone with better expertise. Don’t misunderstand this: this isn’t to delegate responsibility. That’s not something we can do. If friluftslive can be described as “attentive travel in nature at your own risk,” the onus is on you to be attentive to your own capacity. A professional guide will very rarely take greater risks than necessary. Quite the contrary.REDUCE THE RISK
In the world of professional guiding, the Armed Forces and in extreme sports, people often talk about “professional intuition”. This is experience-based learning that’s accumulated over some time, in a very good and systematic way, combined with knowledge. Experience, knowledge and education in combination mean we’re better able to handle and reduce risk. This is because one can more easily recognise situations, risks and the measures to take. Most importantly, you’re far better at “feeling” when something needs to be done. More, we’re better at avoiding such situations from occurring in the first place. This is “professional intuition”. Experience alone isn’t sufficient in itself. The risks themselves, and the potential consequences, must be reduced through things such as training, good preparation and the right equipment. In this way, they’re manageable should they arise. Planning, training and trial and error in a controlled environment are, therefore, essential. During the planning, you can consider the choice of route and make sure that the length and degree of difficulty are in line with your own (and the group’s) physical capacity and skill. If you’re unsure about this, you should at least have a plan B: somewhere to turn around, to spend the night in a cabin, a way to make it to some kind of civilisation. It’s also about planning food, equipment, and so on. Bring the necessary safety equipment and first aid equipment. Be sure to bring a map and compass, even if there may be mobile coverage.ACCEPT THE RISK
In some cases, one can simply choose to accept the risk. This isn’t necessarily problematic if there’s little at stake and very little probability of it happening. But always weigh the consequences. If the consequence is fatal, then one must always weigh it heavily and assess whether it’s worth accepting, despite the low risk and probability. This is how we arrive at a requisite level of knowledge and identify possible risk elements. Necessary preparations serve to reduce risk and allow you to deal with any situation that should arise as it arises. This requires a higher degree of insight, reflection, knowledge and experience – but serves its purpose. There will always be some risk associated with a long ski tour on the plateau, for example, or skinning up to a high peak. But there are many things you can do to prepare yourself for these risks, and thus good choices to make in response should something happen. Experience, knowledge and education will, of course, also be decisive here if you are to make a realistic assessment of the risk you might accept and the consequences your choices may have.10. Leave no trace
Take your rubbish home. Leave nature natural. Don’t ruin it. Don’t go crazy with a chainsaw or a powered vehicle in vulnerable places. Leave the wildlife alone. Only burn what can burn completely. Car tyres and other toxic waste – deliver these where they should be delivered. Dress appropriately for the terrain and conditions. Feel free to take some logs instead of creating a logging field in the forest. And show consideration for others hiking nearby. We have a responsibility; we must take it seriously. There’s no point in saying much more than that about this. This is something everyone should know, understand, and respect.11. Evaluate and learn for next time
Whether the trip went well, not so well, or something unforeseen occurred, evaluate it – discuss WHY. Find out if something could have been done differently; discuss HOW. This is a good way to learn, to become aware of the choices you had, the choices you made, and to continuously map out how things can be made better. Learning doesn’t accumulate without action; it requires us to be aware of our actions – the how, the why, the good, the bad.And to close, and most importantly: have fun. That’s the point! God tur!

Replacing and renewing glue on skins
Unfortunately, skin glue doesn’t last forever. The skin itself, on the other hand, only gets better and better until it wears out. So if you replace the old glue, your skins can last many years. Moribund glue can be replaced, either with tape or sheets, or from a tube. We explain how.

How to feed a hunting dog
Correct nutrition is the alpha and omega for a healthy, strong and happy hunting dog performing to its limits day after day in the mountains. A well-trained hunting dog can quickly cover more than 60 km in hilly terrain, marshes and woods. So if you’re out for a number of days, feeding is everything.

How to use Åsnes short skins
Wondering how to use Åsnes short skins? Not sure what these skins are good for and what the point is? Or wondering how to install a short skin? How to customize them? Whatever it is, here are the answers.

Packing a pulk
A quick introduction to packing a pulk. And a few words about the wonderful combination of pulk and skins. We’re having fun in pack-a-pulk-o!
Boots for cross-country skiing in the backcountry
Nothing ruins the skiing experience as effectively as foot-related woe. Blisters. Wet socks. Sore arches. These things are the enemy. Good ski boots are incomparable – cherish yours once you’ve found them. Here’s a guide to help you find them.
Menstruating on skis
Periods. Because we menstruate in winter too. Stomach cramps while overnighting in the wild aren’t often discussed – which means they ought to be. So curl up with some ibuprofen and a glass of water for some good tips for menstruating in the winter mountains.