Useful (necessary?) knowledge
For us, using a map and compass is one of the cornerstones of friluftsliv – the practical philosophy of life lived under the skies. So it’s something absolutely everyone should take the time to learn. Smartphones and GPS tools with maps have seized the spotlight when it comes to navigation in the wilds. And telephone coverage has also improved enormously, leading many to ditch the map and compass altogether. But for us, hiking without them is a highly risky sport.Why are a map and compass so vital?
For a start, a map and compass never run out of battery. A GPS and a smartphone do, especially old batteries in the cold. Everyone’s experienced a dead phone in the snow. Another point is that there are still many areas with poor telephone coverage, even though the coverage is getting better and better. The way we see it, the phone’s there to take a couple of pictures and to call when you need help. The battery should be saved until you actually need the phone. The last thing you want is to run out of power when you need to alert a search crew. GPS can be used for navigation, but preferably as a backup to the map, to find out precisely where you are. It’s not necessary to slavishly walk the dots on your GPS map. If you’ve mastered map and compass, you can save your battery until you need it.Map and compass: the advantages
Let’s maybe start with the obvious: in bad weather, when visibility’s poor, your compass can save your life. A digital device can run out of juice. It can break. But for as long as the earth has a magnetic field, your compass can point you to safety. You just need to know how to read a map. A good old paper map is an excellent thing. And newer compasses commonly come with aids like a clinometer, a magnifying glass, a mirror, a thermometer and a ruler.Remember that magnets, electronic equipment and metal can affect your compass needle. Some compasses are specifically made to be used all over the glob..
The A, B, C of a map and compass
The map
Topographic maps are most commonly used. You can buy these in all sports shops, at tourist information centres, and even at some petrol stations. The most common scale maps is between 1:10,000 and 1:250,000. These ratios, between a centimetre on the map and a centimetre in reality, indicate how detailed a map is.Contours
On normal hiking maps (1:50,000), the distance between contour lines will normally be 20 m. On orientation maps, or more detailed maps, it can often be smaller..| Scale | Distance | |||
| 1:1000 | 1 m | |||
| 1:2000 | 2 m | |||
| 1:5000 | 5 m | |||
| 1:10 000 | 10 m | |||
| 1:25 000 | 20 m | |||
| 1:50 000 | 20 m |

Contours. Photo: Kartverket
If an area has a ravine up to 19 meters deep, in theory it will be invisible on a map with 20 meter contour lines, and the area will look flat.Magnetic variation
To get a highly accurate bearing we have to remember that the grid on your map isn’t 100% aligned with magnetic north (the direction your needle points to). In Norway, the further north and east you get, he greater the variation is. It’s the same in every country. With some compasses, you can look up the variance before you head out, adjust the dial, and stop thinking about it. The exact figure for the variance (or “declination”) between the north-south map grid and magnetic north is often given at the bottom of the map. There are probably figures there, indicating how much this number will change every year. If the variance is positive, the compass needle points east of the geographic pole; if it’s negative, it points west of the geographic pole. The discrepency varies depending on where you are in Norway: from about 11° east in the east of Finnmark to about 3° west in western Norway. In many places, the distortion’s so small that you don’t need to worry about it anyway.
Navigating in the winter. Photo: Aleksander Gamme
The compass
Types of compass
The most common types are the mirror compass and the base plate compass. Some also prefer sighting compasses, but these are not as common. Regardless of which compass you choose, it must be able to point you north, and to the other cardinal directions. Steer clear of cheap compasses from shady websites and weird-looking giveaway compasses that don’t look quite right. If you suspect that your compass is a dud, check it with someone who knows. A faulty compass can get you lost quite swiftly. Here are some common compass faults:
Silva Speilkompass. En klassiker. Foto: Silva
Global compasses?
It’s probably worth specifying here that compasses are designed to function properly in a specific geographical/ global area. A “European compass” will have a needle that slopes slightly downwards, for example; use it in the South Pole region, say, and there’s the chance that it’ll stick into the plate instead of rotating freely in its housing. You can test this yourself at home by holding the compass at a 30° angle in your hand and rotating it. Some compasses are made with a rounded compass housing, meaning that the needle won’t stick, wherever you use it. These compasses, usually called global compasses, might cost a little extra.Slik tar du ut en kompasskurs
Where are you on the map?
A hiking map isn’t as detailed as an orienteering map, which might make it more difficult to find yourself on it. It’s important to learn to read the map so that you can recognise the terrain. Contour lines are the most important thing to understand, showing gradients and describing topographical features.If you know where you are on the map
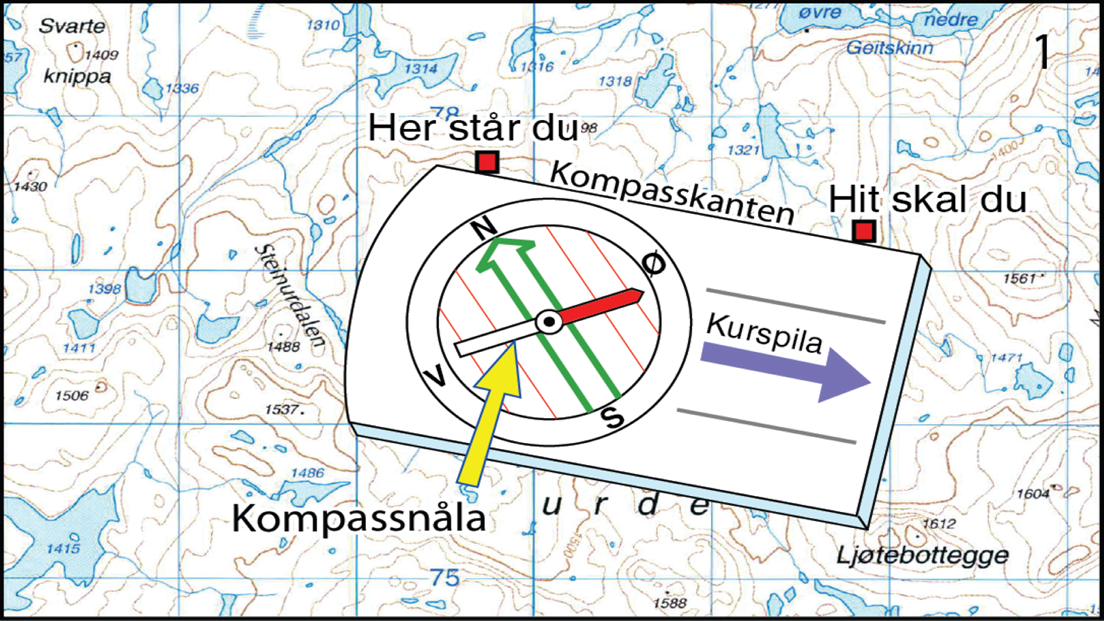
Photo and text: Kartverket
2: Turn the compass housing until the lines in the compass housing are parallel to the north-south lines of the map grid. The compass housing’s N mark must point north on the map (that is, “up” on the map). You’ve now oriented the compass in relation to the map.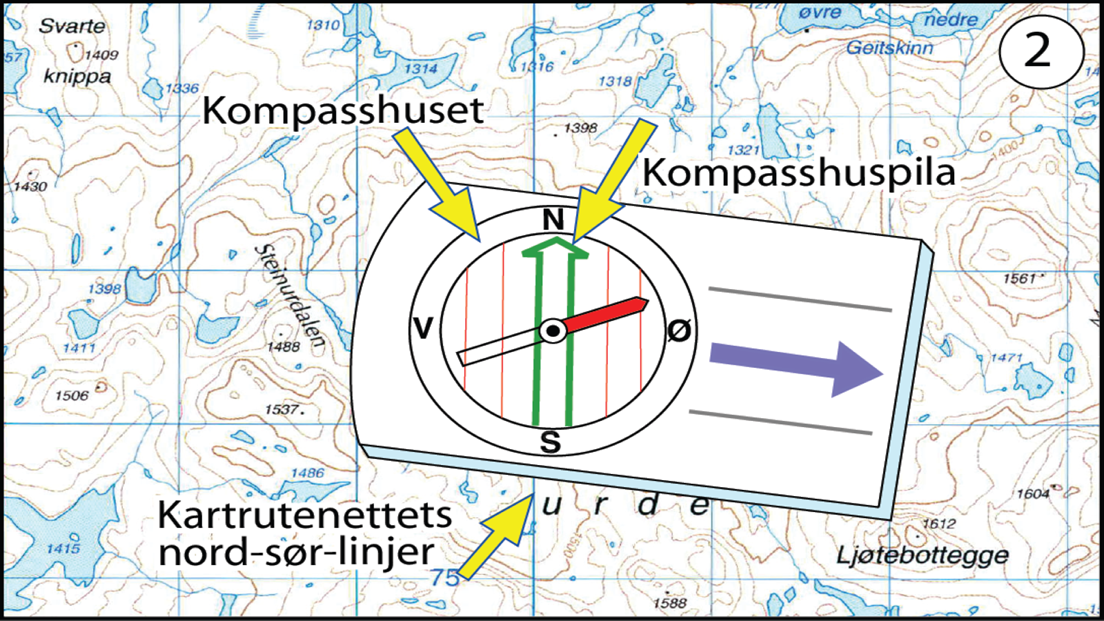
Foto og tekst: Kartverket
3: Hold the compass flat in your hand. The red compass needle will swing freely and align to north. Turn the compass until the compass housing arrow (N mark) coincides with the red compass needle. You have now oriented the compass in relation to the terrain. The direction of travel arrow will then show you the direction you need to go.
Photo and text: Kartverket
Now you’ve found your bearing
Practice
Practice, practice and practice – that’s the solution to really getting good with a map and compass. With practice, it’s very easy to recognise terrain, avalanche threats, gradients, and other things on the map. It is also much easier to plan trips in unfamiliar terrain if you have a good understanding of maps. You can practice with a map and compass even on the finest days on the most well-trodden trails. Take the opportunity to climb a peak, get a good overview of the landscape around you, and see if you can recognise the terrain on the map in real life. When the weather and visibility get really bad, it’s too late to train – but that’s when this knowledge really comes in handy. If you lose a trail, the ability to find your position on the map, set a course with the compass, and find your way back to the trail markings is priceless. Not to mention if you’re injured and you have to give an indication of your location so a rescue team can find you. Whatever the case, it’s simply more interesting to use a map and compass than to travel without. Don’t underestimate the feeling of freedom and joy in getting to know a new area well. If you spot some delicious lines to ski, or lakes you want to fish, you’ll know how to find them later. Following a map when your out in the hills is an excellent habit to start.
Seven tips to find a safe route up the mountain
Here are some simple, concrete, tips on how to find the safest route up a mountain on skis. Some things in life are necessary. Some things aren’t necessarily easy. But, as every skier knows, the only thing that really matters is skiing as much as humanly possible – so getting these down is a question of making life worth living.

Firing up the stove in winter
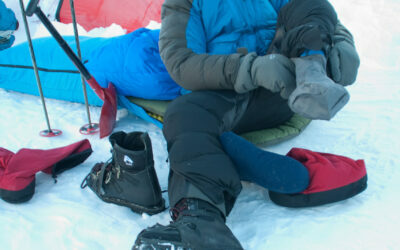
Nothing whets the appetite more than a long day skiing in the winter mountains. Fire up the burner, boil some water for some tea and reach for the packet of dehydrated chilli: paradise found. But doing this in the winter you need to bear a couple of things in mind. So here are some wily strategies to make things easy and safe.

The Mountain Code
Being mountain-wise isn’t a question of knowing what you should and shouldn’t do. It’s about having a conscious relationship with nature; the choices you make; the actions you take. The Mountain Code guides everything from planning you trip to adapting your plans according to what greets you out in the wilds. Here’s a look at the rules, with material largely taken from the creators of the new Mountain Code (2016), the Red Cross and DNT.
Handling hypothermia
Do you know what to do when you’re faced with someone dangerously cold? Command of the basic facts can be lifesaving – and this is just as relevant for us those of us who hit the mountains for the joy of it as it is for guide and members of the rescue services.

Avalanche skills: how to quickpit
You’re ascending a mountain. You need to assess the stability of the snow. While being safe requires gathering information every step of the way, it’s also true that no one wants to spend an hour in a snowpit, especially in bad weather. So let’s talk about “quickpits” – an efficient snow-profiling method that serves as a very good middle ground for gathering information about snow cover. The technique’s used frequently by experienced guides to gather useful – if incomplete! – intelligence while keeping toes and fingers warm. Here’s how it’s done.

So – what exactly is a skin, anyway?
Skins are more than a strip of carpet with glue on the back. They’re tools designed to help us in pursuit of pristine snow, perfect lines, and/or solitude. Something this magical demands a proper description of how it’s made.